Friday, 26 November 2010
Fitting Radiator
Radiator was positioned roughly in the right place, the top about 4" above the chassis top rail, then we drilled 2 3mm holes in the top of the brackets on the chassis and used zip ties to hold it in the right place before putting the nose cone on to check for clearance. Once ok, we drilled 6mm holes in all 4 positions and used M6 cap head screws to bolt it in.
Engine Mount
Engine mounts were made using a piece of 5mm mild steel drilled to suit the holes in the block, with some 3x 1.5" box section with a cap welded on the end. In this cap an 8mm hole drilled, and some heavy duty Capri engine rubber mounts used, these have an M8 stud sticking out each end.
On the other end of the rubber bit, I had some mounts left over from I think a mk2 Escort RS2000, probably from Rally Design. The Zero chassis was then drilled to suit, and all bolted up with nylocs.


On the other end of the rubber bit, I had some mounts left over from I think a mk2 Escort RS2000, probably from Rally Design. The Zero chassis was then drilled to suit, and all bolted up with nylocs.
Sunday, 17 October 2010
Oil Cooler; Done.


Published with Blogger-droid v1.6.3
Thursday, 23 September 2010

Tuesday, 7 September 2010
Engine and Box Together at last
A quick update, minus photos unfortunately due to both of us wanting to just get on with it rather than stopping to take pics!
We bought a clutch from ebay but picked the wrong one, sent it back and got another wrong one in replacement, cancelled that one and ended up with the bargain of the century from http://www.buypartsby.com/, a little over £100 for a clutch kit - for 228mm B204L Turbo. Note that if using the hydraulic clutch cylinder from the Omega, you need the hydraulic Saab clutch type. Our Saab was a cable clutch originally. The clutch catalogues refer to it as 'Concentric bearing' and it differs as the spring fingers on the clutch cover are slightly rounded off, and the matching hydraulic thrust bearing is flat faced rather than round faced as per the cable clutch type. Clutch kits for hydraulic type tend not to come with a new thrust bearing.
Now I've read in a lot of places that the cylinder needs spacing out from the gearbox as the Omega has a huge thick dual mass flywheel, but the Saab one is skiny. Places like SBDevelopments sell spacers if needed. We put a straight edge across the clutch fingers and mesured distance to block face (64mm), then measured depth from bellhousing face to clutch bearing face, also 64mm! So unless something is wrong, we can't see the need for a spacer. Time will tell...
Before fitting a clutch, you need a spigot bearing, we got one from ebay, from memory its 21mm OD, 15mm ID, check it fits on your gearbox shaft before bashing it into the end of the crank with a bit of wood and a hammer. Try freezing it first to contract it slightly before installing.
So, we fitted the clutch to the flywheel using an alignment tool, which didn't help so we had to loosen clutch cover bolts, move the friction plate dead central then re-tighten cover screws.
Next we lightly greased the input shaft and mated the gearbox and engine together. It takes some wiggling but all of a sudden will drop into place. Bolts tightened up and voila! One very heavy lump of metal swinging from the engine crane to be installed in our chassis.
Sunday, 1 August 2010
Sump and pickup pipe
A long time since the last post... due to me getting married and Mike's packed stag-do/wedding calendar, but progress has still been made.
The sump is very deep on the Saab so we knew we'd have to cut it down. However, the pickup pipe design means that taking much more than the angled-wedge bit off would be tricky, requiring baffles and sump extensions. So we made a compromise and took off the wedge, roughly 1" on the deepest bit, meaning the engine will sit slightly higher than planned. Besides, the gearbox bellhousing sits pretty low anyway so that would still cause an issue with the sump any shallower. Sump modified by AS-Motorsport in Essex, who did an excellent job and quite reasonably priced.
Pics:

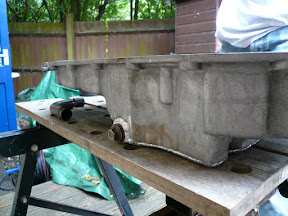
Next I had to modify the pickup pipe which needed shortening. This was done using a Mig Welder. Not really necessary but I ground the welds smooth in case of any bits of spatter that might dislodge and damage the engine.


The sump is very deep on the Saab so we knew we'd have to cut it down. However, the pickup pipe design means that taking much more than the angled-wedge bit off would be tricky, requiring baffles and sump extensions. So we made a compromise and took off the wedge, roughly 1" on the deepest bit, meaning the engine will sit slightly higher than planned. Besides, the gearbox bellhousing sits pretty low anyway so that would still cause an issue with the sump any shallower. Sump modified by AS-Motorsport in Essex, who did an excellent job and quite reasonably priced.
Pics:
Next I had to modify the pickup pipe which needed shortening. This was done using a Mig Welder. Not really necessary but I ground the welds smooth in case of any bits of spatter that might dislodge and damage the engine.
Saturday, 1 May 2010
Pedals
Had another go at the pedals cause with the bushes in, the brake pedal would not move on the pivot shaft. The others were fine with a 14mm drill bit run through but not the brake pedal, so I wrapped 120 grit sand paper round an m10 bolt, shoved it through the middle then spun the pedal around it (for ages). Did the trick! Also cleaned up the surface of the pivot tube with 180 grit wet and dry.
 |
| From Zero 010510 |
Subscribe to:
Posts (Atom)