|
| From Zero Build Diary |
Sunday, 31 January 2010
Engine removed
So after a great ski trip it was time to get back to work on the kit car this weekend. The aim was to complete the removal of the Saab engine, rounding off all of the donor car activities from both the sierra and the Saab.
We started the by removing some of the wheel arch plastic liners and unbolting the aircon compressor and letting it hang out of the way. Then we got down to the main part of the task, undoing the wishbone balljoints and steering arm balljoints - which all went very smoothly with the Haynes manual for guidance. Pulling the suspension legs outwards let the driveshafts drop out. We then used the engine crane to take some of the weight of the engine as shown in the pic below.


Then it was just a few engine mounting points to be unscrewed and the engine was hanging free on the crane. We lowered the engine down onto some wood, where the engine sat surprisingly stable. As we don't have access to a pit or ramp or anything like that, we had to use the engine crane to lift the now empty front of the car as high as possible. We then removed the brake disc and suspension arm from the right hand side of the car to enable us to drag the engine out from underneath the car with some help from a couple of friends due to the weight of the engine!


We started the by removing some of the wheel arch plastic liners and unbolting the aircon compressor and letting it hang out of the way. Then we got down to the main part of the task, undoing the wishbone balljoints and steering arm balljoints - which all went very smoothly with the Haynes manual for guidance. Pulling the suspension legs outwards let the driveshafts drop out. We then used the engine crane to take some of the weight of the engine as shown in the pic below.

As the engine is removed from the bottom of the engine bay then the front subframe had to be unbolted and removed.

Then it was just a few engine mounting points to be unscrewed and the engine was hanging free on the crane. We lowered the engine down onto some wood, where the engine sat surprisingly stable. As we don't have access to a pit or ramp or anything like that, we had to use the engine crane to lift the now empty front of the car as high as possible. We then removed the brake disc and suspension arm from the right hand side of the car to enable us to drag the engine out from underneath the car with some help from a couple of friends due to the weight of the engine!

We put the front subframe back on the car to allow us to refit the wheels to roll the car out of the way to put the engine into the garage. So now we have a finished all the tasks with the Saab, it will soon be going to the scrap yard after a final check that we have all the parts we think we will need from the car. In an ideal world we would keep the Sierra and Saab shells throughout the build in case we have missed something, but space limitations mean they have to be gone before the kit arrives in a few weeks time. So I'll leave you with a couple of pictures of the 2.0 turbo engine from the Saab that will be the heart of this Zero!


Thursday, 14 January 2010
Kit ordered
So now that we are close to finishing up with the saab, I ordered the kit itself last week, as we should have got rid of the snow and therefore finished the saab before the kit is ready for us.
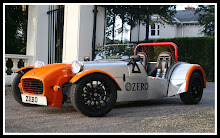
I've gone for the Zero plus kit, in orange. I asked GBS to remove the wheels from the kit and knock off the price of them, which they were happy to do. I was not especially taken with the look of the standard wheels they offer, so hopefully i should be able to find something better at a comparable price.
I did go for two other options on top though, the GRP rear wheel arches (£80) and powder coating the chassis (£280). The plastic rear wheel arches look a bit more modern and will be a lot easier to put on than bending metal sheets into an arch. Powder coating the chassis will give a much more professional paint job than if I painted it myself, and should save us quite a bit of time.
The kit should be ready for me to go and pick it up around mid feb, will have to hire a long wheel base transit van for the day to get all the parts.
Unfortunately from the car point of view (good news from my point of view!) I'm going skiing for a week now, so that pretty much takes out the next two weekends. So the saab engine is not likely to be out of the car until the last weekend of Jan now. We have been getting on with some other prep work and planning tho in the warm out of the snow!
Saturday, 2 January 2010
ECU
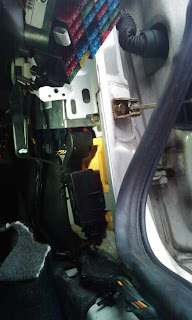
So now chritsmas has been and gone Nick and I finally had some time to work on the car just before the end of the year. Although the engine is ready to come out of the saab we thought we would tie up all the other little bits we needed to do to the saab first. So the main task was to get the ECU out along with the wiring loom that connects it to the engine. The ECU is a metallic box located just inside the drivers door, as shown in the pic.

We also took the instrument panel out of the dashboard, in case we decide we need / want any of the dials. This was mostly achieved with brute force, so the dashboard is in quite a few pieces now!

There are a lot of wires in the saab 900, but fortunately the wiring loom for the engine from the ECU is separate from the other parts of the car wiring, making it relatively easy to remove. We had already disconnected most of the connectors from the engine while prepping that for removal, so the loom just had to be fed carefully through the hole into the drivers footwell once the ECU had been unscrewed. See the pic of Nick holding the ECU and engine loom.

We also took the instrument panel out of the dashboard, in case we decide we need / want any of the dials. This was mostly achieved with brute force, so the dashboard is in quite a few pieces now!
Subscribe to:
Comments (Atom)